
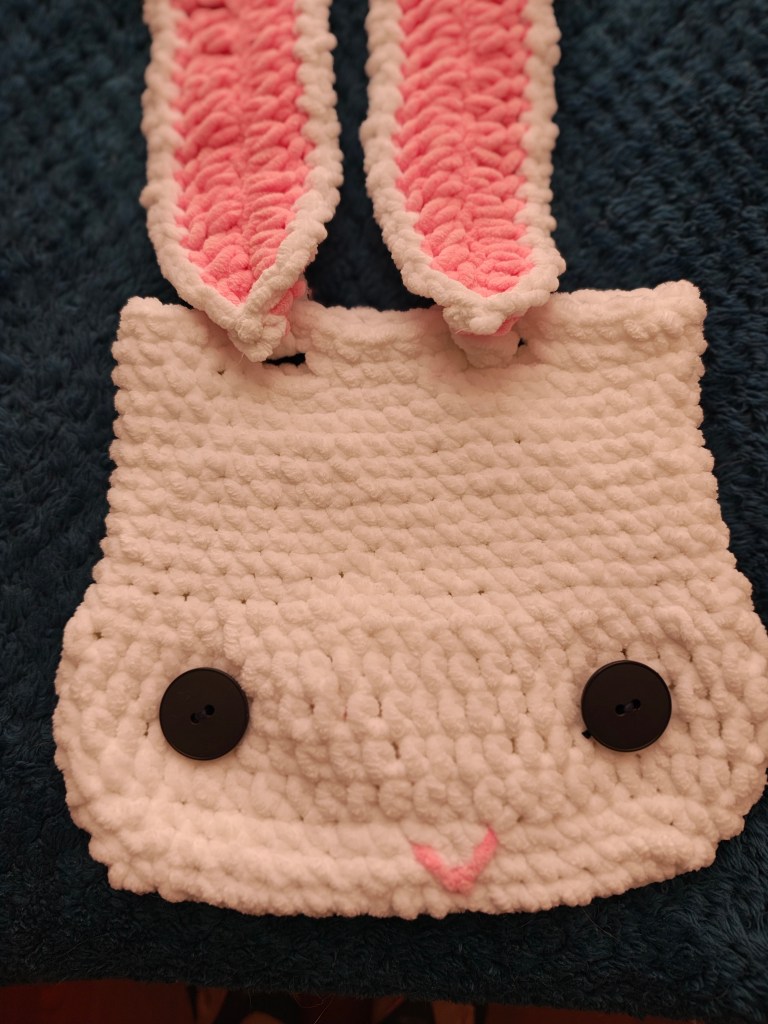
The first free pattern from ViVaCrochet for the Easter Advent Calendar is the Knotty Bunny Bag.

This is a quick and easy bag worked from the base up. The nature of the half double crochet gives shape to the face of the bunny.
The idea for the straps and the way it closes the bag was inspired by Rashmi’s Summer Vibes Sling Bag Don’t forget to check her bag and show some love:)
The yarn used for this bunny bag is LoopnCraft Lux Velvet in white and Nako bonbon Panda Baby yarn in pink . No affiliation to either of the sites, just love their service and collection of yarns:)
For the eyes, I used black buttons and used the pink yarn to embroider the tiny nose:)
The ears are attached to the front bag straps.
Ok! Let’s get started….
Knotty Bunny Bag
Materials Needed
Lux Velvet by LoopnCraft 1 ball white (yarn comes in 100 gm/3.5 oz – 120 m/131 yds)
Nako Bonbon Panda Baby yarn 1 ball pink (yarn comes in 100 gm/3.5 oz – 120 m/131yds)
Just 80 gms (96 yds) of white and 20 gms (24 yds) of the pink yarn was used for the bag.
Crochet hook size 5.5 mm
Stitch marker (to be able to tell where the rounds begin )
Yarn Needle to weave in ends and to attach the ears to the strap
2 Black Buttons approx 2″ n diameter
Scissors
Finished size: 9″ across at the widest part by 8″ tall (not including the handle). The handles measure 34″ long. The ears measure 3″ wide by 12″ long.
Gauge: Not important for this project. But to give you a reference point here goes – 4hdc = 1″ 3 rows of hdc = 2″
Difficulty: Advanced Beginner
Stitches and Abbreviations
Beg Beginning
Ch Chain
Dc Double crochet
DblCh Double chain
ESc Extended Single crochet
Hdc Half double crochet
Sc Single crochet
Sk Skip
Sl st Slip stitch
Sp Space
St Stitch
Yo Yarn over
Notes
1: The Extended single crochet is worked as follows: insert hook into the st indicated, yo, pull up a loop, yo , pull through one loop only, yo pull through 2 loops.
2: The Double Chain is a variation of the foundation sc and is worked as follows : chain 2, insert hook in the first chain, yo, pull up a loop, yo, pull through 2 loops. * Now insert the hook into the side bar of the st just completed and yo, pull up a loop, yo, pull through 2 loops * .Repeat the instructions between *..* for the desired length.
3: Only the first 3 rounds are joined to the first stitch with a slip stitch. The rounds thereafter are not joined with a sl st to the first st. Instead they are worked in continuous rounds. This avoids the seam line. You can place a stitch marker in the first st of these rounds to help you identify the beg of rounds.
4: The ears are worked separately and attached to the straps.
5: The strap is one long length of double chain that is threaded through the special opening created in the bag. The sample double chain is 150 sts long.
6: The yarns are not suitable for ripping 😦 So make sure you have as fewer mistakes as possible:)
Instructions
Round 1: Ch 18, 2 sc in the second ch from the hook, 1 sc in each of the next 15 ch, 3 sc in the last ch, continuing to work on the other side of the starting ch, 1 sc in each of the next 15 ch, 1 sc in the same ch as the first ch. Join to the first sc with a sl st – 36 sc.
Round 2: Ch 1(does not count as st), 2sc in the first 2 sts, 1 sc in each of the next 15 sts, 2sc in each of the next 3 sts, 1 sc in each of the next 15 sts, 2sc in the last st st. Join with sl st to the first sc – 42 sc.
Round 3: Ch 1(does not count as st), 2sc in the first st, 1 sc in the next st, 2sc in the next st, 1 sc in the next st,1 sc in each of the next 15 sts, (2sc in the next st, 1 sc in the next st) 3 times, 1 sc in each of the next 15 sts, 2sc in the next st, 1 sc in the last st st. Join with sl st to the first sc – 48sc.
From round 4 onwards you will work in rounds without joining to the first st. If it is easier to see where the round ends, place a marker in the first st and move it up every round.
Round 4: Ch 1(does not count as st), 1 hdc in each st around, do not join – 48 hdc.
Round 5 – 7: Repeat round 4.
Round 8: Ch 1(does not count as st), 1 Esc in each st around, do not join – 48 esc.
Round 9: Ch 1(does not count as st), 1 sc in each st around, do not join – 48 sc.
Round 10 – 17: Repeat round 9.
The next round creates the holes for the straps to pass through. This round you will join to the first st with a sl st.
Round 18: Ch 1(does not count as st), 1 sc in the first 6 sts, ch3, sk 3 sts, 1 sc in each of the next 6 sts, ch3, sk 3 sts, 1 sc in each of the next 12 sts, ch3, sk 3 sts, 1 sc in each of the next 6 sts, ch3, sk 3 sts, 1 sc in each of the last 6 sts. Join to the first sc with a sl st – 36 sc, 4 ch3 sp.
In the next round , you will make 1 sc in each st and 3sc in the ch3 sp (into the ch rather than into the ch sp).
Round 19: Ch 1(does not count as st), 1 sc in each of the sts and in each ch around. Join with sl st to the first sc. Fasten off – 48 sc.
Weave in the ends.
Straps
With white, make 150 double chain. Thread the strap into the ch3 sp created in round 18. Join the first and the last double chain. Fasten off and weave in the ends.
A picture is worth a thousand words:) Hope this helps in undertanding how to thread the strap through the ch3 spaces you have created.
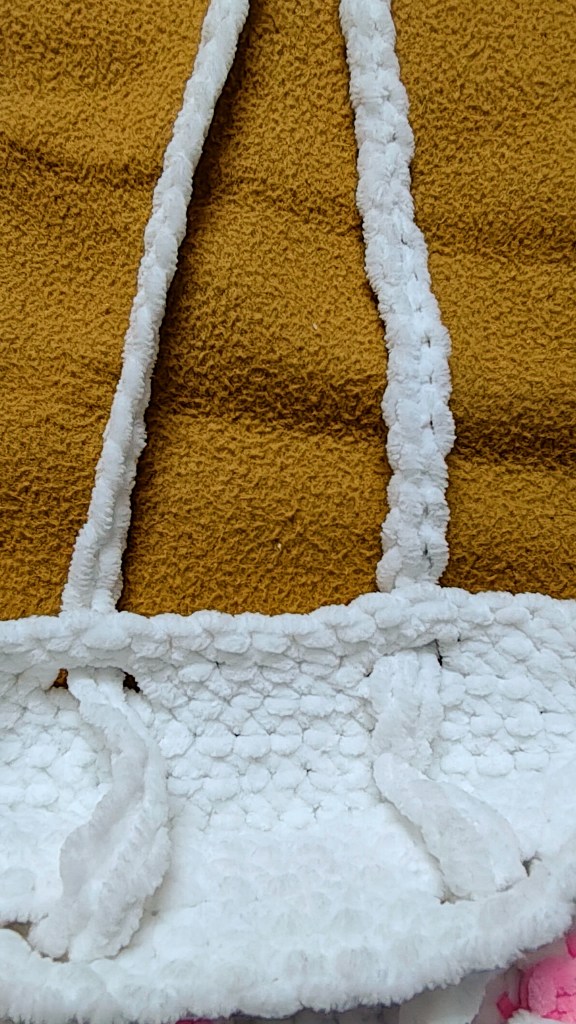
Refer here if you need a visual explanation of the double chain:)
Ears – Make 2
Round 1: Ch 26, 1 sc in the 2nd ch from the hook, 1 sc in each of the next 2 ch , 1 hdc in each of the next 3 ch, 1 dc in each of the next 15 ch, 1 hdc in each of the last 4 ch, continuing to work on the other side of the starting chain, 1 hdc in the next 2 ch, 1 dc in each of the next 17 ch, 1 hdc in each of the next 3 ch, 1 sc in the last 3 ch. Join with sl st to the first sc. Fasten off leaving a long tail.
Round 2: Attach white in the first sc with a sl st, ch1, (sl st in the next st, ch1) around. Fasten off.
Finishing
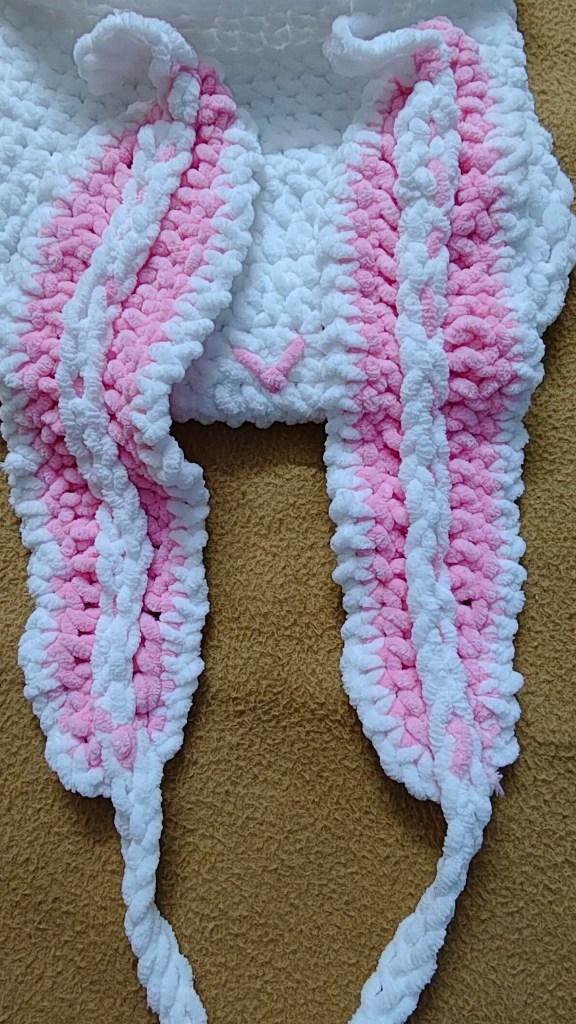
Attach the ears to the front strap with white yarn, pinching the bottom of the ear as you attach.
Simlilarly anchor the top of the ear to the strap.
The picture shows the wrong side of the strap after anchoring the ears.
Now use the pink tail and make a running stitch along the starting chain of the ear , anchoring the ear to the strap.
Mark the position for the eyes. In the sample bag, the buttons are placed on Round 6 and approximately 12 sttches apart.
Next embroider the nose , making sure to place it between the eyes .
That’s it! Take your bunny bag on your Easter Egg Hunt!
Enjoy!
PS. I did give the bag a nice steam blocking to settle all the pieces!


Leave a comment